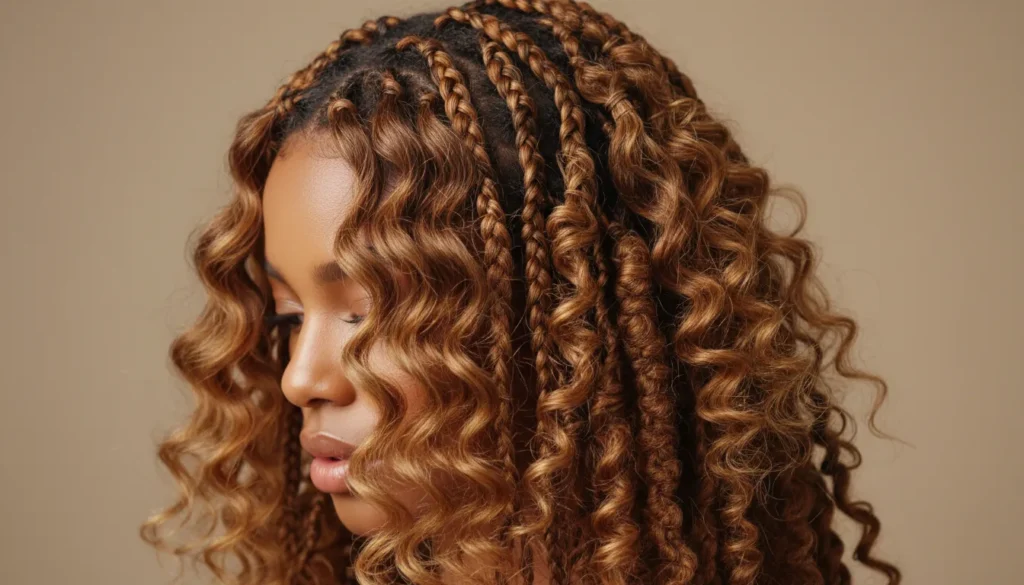
If you love a style that looks artsy, romantic, and effortlessly dimensional, this boho braids and boho locs combo is about to become a favorite. The whole vibe is “mixed” on purpose: some braids are kept simple with curly body wave hair, while other sections are turned into boho locs using springy wrapping hair.
What makes this look extra pretty is the way it plays with length and placement. Some braids stop sooner so the curls show earlier. Others go longer so the curls appear at different starting points. Then, every now and then, a lock section breaks up the pattern and adds that textured boho energy.
What You’ll Create (The Look and the Why)
This style mixes three key textures:
- Braids with braiding hair
- Braids with human hair (body wave) for that soft, romantic curl pattern
- Boho locs created by wrapping springy afro twist hair around a braided base
You also get a built-in “custom look” depending on where you place the locks. From the front, you may see more curls. Turn slightly and you’ll catch the locks. That variation is exactly the point.
Good to know: there’s no hard and fast rule for how often to add locks. You can do more braids, more locks, or a balanced mix. The style is forgiving as long as you pay attention to tension and wrapping.
Materials You’ll Need
Here are the hair types used for this boho braids and boho locs combo. (Use the same type or any comparable lengths and textures.)
- Braiding hair (pre-stretched): used for the main braid base
- Human hair body wave (18 in): used to add natural-looking curls and depth
- Springy afro twist wrapping hair: used to form the boho locs
Human hair used: body wave (18 inches). Braiding hair length used: 42 inches. Springy afro twist wrapping hair is used to wrap and form the loc texture.
If you want the exact links, the original set of hair options comes from:
- Human Hair Body Wave: https://amzn.to/4dG1R9Q
- Braiding Hair: https://amzn.to/4svlHIu
- Spring Twist Wrapping Hair: https://amzn.to/4smABAJ
How to Prep the Style: Building the Braids First
The method starts with classic braids using pre-stretched braiding hair. Then, after a couple of inches, you splice in pieces of human hair to get the body wave curls woven through.
1) Start with regular braids, then add the human hair
Create a braid using braiding hair. After you’ve braided a couple inches, clip off what you need and continue braiding.
Once you reach the half mark, secure the human hair in place using a slip knot so the braid doesn’t come undone.
2) Make the slip knot (simple and secure)
Use a tiny piece of the curly human hair and tie it so it holds inside the braid. The process used was:
- Wrap the hair around your index finger
- Use the tail of a comb to pull the end of the hair through the loop two times
- Tighten it so it locks into the braid
3) Use a good amount of curl pieces per braid
In this install, only one pack of body wave human hair was used. One pack is usually enough unless you want heavier curls.
Placement was customized by using three curly pieces per braid, but you can adjust:
- Add more curls if you want a fuller, more curl-forward look
- Add less curls if you want more braid visibility
The “rule” is flexible. Creativity is the name of the game.
Key Styling Trick: Vary the Curl Starting Point
One of the biggest reasons this style looks dimensional is that not every braid runs the same length.
Some braids are braided farther down than others, which means the curls start at different points. Instead of seeing one straight line where the curls begin, you get natural-looking variation.
That variation helps the style not look all one length.
Row-by-Row Build: Where the Locs Come In
The install moves through different rows and alternates the pattern. You’ll do:
- Some rows with mostly braids
- Some rows with locks on one end or the middle
- Random placement sometimes, but with an eye for balance
There’s no “only way” to do it. Just pay attention to symmetry and balance so it feels intentional.
First row: mostly braids with occasional locks
The first row is primarily braids. Every now and then, a lock is added, but it’s not constant.
Second row: locks with curly texture showing
The second row begins with a lock on the first section. That’s where the lock-making process takes over.
Third row: mostly braids with a single lock in the middle
For the third row, two braids are placed side by side to start the row. This row is mostly braids, with one lock in the middle.
This row-to-row variation is what keeps the style from looking repetitive.

How to Create Boho Locs (Spring Twist Wrapping Method)
Now for the fun part: turning a braid section into a boho loc using springy afro twist wrapping hair.
1) Overlap and braid in the human hair base
For a lock section, the human hair is overlapped with itself to get the desired thickness and length. Then, instead of using the regular braiding hair for the lock part, the human hair is braided in to build the base.
Braid the human hair until it reaches where you want the loc to stop. In the example, it was around 3 to 4 inches down (less than the halfway mark).
2) Wrap with springy afro twist hair to form the loc
Use the springy afro twist wrapping hair to wrap and shape the loc texture.
The process:
- Wrap around the base of the braid about four times before you start wrapping downward
- Wrap firmly so the loc does not loosen prematurely
- Make sure each wrap overlaps the previous one with no gaps
- When done, finish with a palm roll to seal the end
Loc length + curl visibility
The look is meant to feel light. Many locks do not extend fully down because that can add extra weight.
Most lock sections keep the curls visible higher up, while some sections can be made longer for variety. That’s why you might occasionally see:
- A braid that goes farther down with a small curl at the end
- A lock that goes farther down for a longer loc detail
This mix of short and longer pieces adds movement and keeps everything from looking uniform.
Two Important Length Rules (So the Style Looks Right)
There are a couple length details that make a big difference in how the finished style feels and looks.
Rule 1: Not all braids should be braided all the way down
Braiding everything fully down can make the style heavier. In this install, most braids stop earlier to keep the look lightweight, since the curls are the main show.
Rule 2: How you handle the human hair differs by braid length
The approach changes depending on whether the braid stops early or goes full length:
- If the braid stops early (halfway or shorter): cut the human hair in half so you can achieve the intended curl placement and proportion.
- If the braid goes farther down: braid the human hair in without letting it hang out of the braid along the plait.
- For full-length lock sections: braid the human hair all the way to the end so the loc can be wrapped all the way down, while leaving the curl at the very end.
One example mentioned: when a section is braided all the way to the end, a portion of curls is left out at the end for a finished, curled tip.
What to Expect with the Human Hair (Length and Curl Behavior)
The human hair used is labeled as 18 inches. It may appear longer once installed, especially because the curls elongate as you pull the hair down.
So if you’re shopping and wondering if 18 inches will be long enough, the install results suggested it can look even longer in the final shape.
Finishing the Install: Interspersing Braids and Locks
After building the rows and creating your lock sections, finish by interspersing remaining braids with a few locks placed throughout.
The original install leaned toward more boho braids than locks, but the same method can be adapted:
- If you want more locks, add more lock sections and sprinkle in braids
- If you want a lighter, curl-heavy style, keep locks fewer and more spaced out
Again, the “rules” are flexible. The goal is balance, texture, and placement that feels intentional.
Result: Lightweight, Soft, and Super Versatile
Once the installation is complete, the biggest win is how it feels. Because the style relies heavily on curls being left out and not every braid being braided fully down, it stays lightweight.
The body wave adds soft, romantic curl patterns. Depending on how you look at it, you’ll notice different things:
- Some angles show more locks
- Other angles show mostly braids and curls
- Overall, the mixture creates depth and movement
If you want a style that looks styled and intentional but doesn’t feel heavy, this boho braids and boho locs combo delivers.
FAQ
How often should I add locks in boho braids and boho locs combos?
There’s no hard and fast rule. You can do mostly braids with a few locks, or add locks more frequently. What helps is keeping some symmetry and balance so the placement feels intentional.
Do I need more than one pack of human hair body wave?
Typically, one pack is enough for this type of look, especially when you’re using a few curl pieces per braid. If you want much heavier curls, you can add more pieces per braid or use more hair.
How do I keep boho locs from loosening?
Wrap firmly at the loc base and make sure every wrap overlaps the previous section with no gaps. Finishing with a palm roll also helps seal the end.
Should I braid every section all the way down?
Not necessarily. Braiding all sections fully down can make the style heavier. A lighter result comes from stopping most braids earlier so curls show where you want them to.
What’s the difference between short braids and full-length lock sections?
For shorter braids, the curly hair may be cut down (like halving it) to match the braid length and keep curl placement balanced. For full-length lock sections, the human hair is braided to the end so the loc can be wrapped all the way down, leaving curls at the tip.
Where should the human hair go in a braid?
In this method, human hair is woven in during the braid build, then secured around the half mark with a slip knot so it stays in place.